Here's a short technical article for my fellow Pixinsight learners. It's about some progress I recently made in learning how to reduce background noise in astronomical images. These images, like any images made in low-light situations, have the potential to be plagued by a `grainy' appearance, particularly in the dark background areas. In the parlance of astronomers and amateur astro-imagers, we say that our images commonly exhibit `noise' in the `low-signal-to-noise-ratio (low SNR) areas'. This noise can be reduced by racking up as many hours of exposure time as possible, but there's a limit as to what our schedules (and the weather) will allow.
Noise can also be reduced somewhat in post-processing by using software routines, such as those in Pixinsight. This post is a journal entry of sorts, to record how I managed to smooth the noisy background areas of an image of a galaxy cluster. It allowed me to go from this:
To this:
For me, this was a much better result than I'd gotten before, and it happened because I managed to correctly tweak a setting in one of Pixinsight's noise-reduction routines. Details follow, for any other PI users who might find the information useful.
Image Acquisition
As I described in an earlier post, I'd already taken one stab at shooting Markarian's Chain, a prominent grouping of bright galaxies in the Virgo galaxy cluster. After my first attempt, I found a weeknight in late May 2012 when I could re-shoot the Chain, with proper framing this time! The data were acquired with my ED80 imaging rig: An Orion ED 80 f/7.5 refractor and an SBIG ST-8300M CCD camera, on a Losmandy G-11 mount. As I only had one night to acquire the data, I shot through a clear (`Luminance') filter, so as to make a black-and-white image. I managed to get 32 five-minute subexposures, for a total exposure time of 2 2/3 hours.
Ideally, I'd have liked to get at least several hours of exposure time on a target like this, so as to build up a decent SNR in the faint outer parts of the galaxies, and in the dark background areas. I knew that if I was going to make a final image that showed more than just the bright cores of the galaxies, it would take some wizardry with Pixinsight's noise-reduction settings.
Noise Reduction at the Linear Stage - The General Idea
I followed the same general strategy for this image as I had done with the last several images, namely to reduce noise (in the dim, low-SNR areas) and sharpen details (in the bright, high-SNR areas) while the image was still at the linear stage. In other words, the noise reduction and sharpening (`deconvolution') were to be done while the pixels still had their original brightness values, nearly all of which are too dark to show up well on the computer screen, without having their values mathematically `stretched', which would destroy the linear relationship between their brightness values and the true brightness values of the objects in the scene. This basic strategy was laid out by Pixinsight creator Juan Conejero. The ever-obliging Harry Page made a nice video of this type of workflow, and the technique was updated by Juan for a new version of the key tool.
The general idea is to use a powerful-yet-rather-mysterious tool called Multiscale Median Transform (MMT) to smooth the image to a greater or lesser degree. This smoothing can be (and needs to be) applied more strongly to the dimmer, noisier areas. Conversely, it can be (and needs to be) applied less strongly to the brighter areas. A copy of the image, called a luminance mask, is used in order to apply the process more to the dark areas, and less to the light areas - see Juan's posts and Harry's video for more information on luminance masks.
So, to start at the beginning: I had calibrated my light frames with dark, flat, and bias frames, and aligned, registered, and statistically combined the calibrated subexposures. Here's an autostretched closeup of the noise I had to deal with:
My goal was to try and smooth the noise, although I knew I wouldn't be able to do a perfect job of it. I wanted to smooth it enough, however, to make it worth stretching the image so as to bring out most or all of the faint outer parts of the galaxies. Part of this process involves protecting parts of the image from the noise-reduction tool, and this is the goal of luminance masking.
Luminance Masking - Juan Knows Best
In a recent post, I described my use of PI's Range Selection tool to make luminance masks. I thought it made a lot of sense to build at least two or three separate masks, and then to apply MMT noise reduction to the different zones that would be delineated by these masks. In my `M87 Chain' image, I tried applying different MMT noise reduction settings to three zones: 1) The dark, noisy background, 2) the dim, fairly noisy outer parts of the galaxies, and 3) Deconvolution sharpening, rather than noise reduction, to the bright core areas of the galaxies.
Sometime later, I found myself thinking `wouldn't it be nice to be able to make just one mask, which would automatically apply more protection (from the noise-reduction routine) to the brighter areas, and smoothly reduce the amount of protection applied to the dimmer areas?' After a little while, I slapped my head and said `You fool, that's what Juan taught us to do in the first place! He uses an inverted copy of the image itself as the luminance mask, and this does the automatic masking you're looking for!' This is a really basic idea, and I felt silly for having concocted my separate-masks approach in the first place.
So, I made a copy of the image, inverted it, blurred it with the Convolution tool, and applied it to the image:
The redder areas have more protection applied to them, and the closer-to-black areas have less protection applied to them, so they will undergo more noise reduction, even with only one application of the MMT tool.
First Attempt at MMT - Little Dark Blobs
I love Pixinsight because it's so powerful, and because the people who are really good at it are able to achieve some amazing results. I aspire to understand all of PI's tools at a `master' level someday, if that's even possible. However, some of those tools, like MMT, have a lot of settings to tweak, and it's hard to know what values to use for the various settings. As I describe what I did with MMT in this case, I'll assume the reader has examined the posts by Juan Conejero that I linked above.
When using MMT for noise reduction, one generally needs to check the Noise Reduction box for each of the wavelet layers. Additionally, it seems that MMT noise reduction should be applied more strongly for the small-scale layers, and less strongly for the large-scale layers. (As near as I can tell, this seems to mean using larger Threshold settings on the smaller-scale layers, although for the life of me I don't know what the Threshold numbers mean.) After some iterating, I arrived at these settings:
These settings did manage to smooth the background, but I was left with a number of little dark blobs scattered around the image - I think you can see them here:
Hmm. Close, but no cigar. If only there were a way to get rid of those little dark blobs!
`Adaptive' to the rescue
Casting about for a solution, I read the long tooltip for the `Adaptive' sliders in the MMT noise-reduction dialog. It contained this line: "Increase this parameter when you see isolated, high-contrast, relatively small structures that survive after finding an otherwise good noise threshhold value." This sounded promising. But how to minimize the time I'd have to spend iterating the Adaptive values?
Here's what I did: I used PI's ExtractWaveletLayers script to break the image down into its constituent layers of detail. Zooming in closely to each layer, I noticed that the `dark blobs' seemed to be about 16-32 pixels in size, roughly speaking. So, I gently increased the Adaptive settings for the 16-pixel and 32-pixel wavelet layers in MMT:
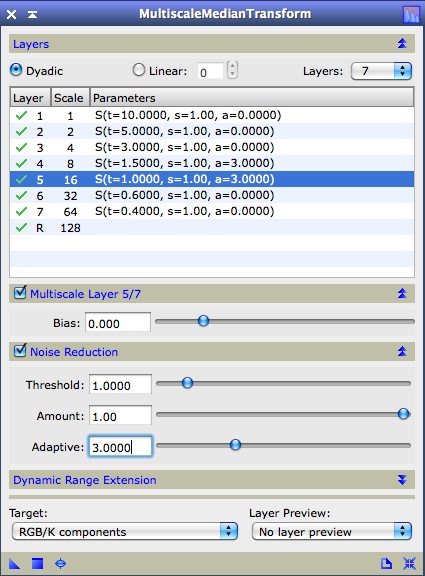
Having done this, I got a better, smoother result:
It's a small victory, and I suppose it's nothing to brag about, but for a Pixinsight learner like me, it felt good to be able to smooth a noisy image this much, without the image looking too drastically over-smoothed. I was eventually able to use this noise reduction as one step in the overall processing of my Markarian's Chain image. That image will be the subject of the next post!
Showing posts with label Markarian's chain. Show all posts
Sunday, July 15, 2012
Sunday, June 10, 2012
The M87 Chain and the Pixinsight Zone System
One of the greatest euphemisms in the world has to be the phrase `learning experience'. How often do we sugar-coat our mistakes by calling them `learning experiences'? I'm sure I've done it many times. This image provides an example, but in this case there's a bit more to it than that...
Data Acquisition: Making the best of a bad situation
A few weeks ago, I was doing some backyard imaging, and the Virgo galaxy cluster seemed like the logical choice. Having shot a luminance image of the Leo Triplet not long before, I decided to do another one-night stand, with just luminance, but this time I wanted to shoot `Downtown Virgo'. (The origins of that term and its enthusiastic usage seem to go back to Jay Freeman and Jamie Dillon, two highly-accomplished Bay Area visual observers.) Specifically, I wanted to shoot the portion of the Virgo cluster called Markarian's Chain. It's a standard target, since it comprises a pretty, arc-ing chain of galaxies that stretch from M84 and M86 towards M88. Almost everyone works on an image of Markarian's Chain at some point. By planning it out in SkySafari Pro 3 on my iPad, I could see that if I rotated my camera just right, I could frame most of the chain pretty nicely on my ST-8300 sensor, using my ED80 f/7.5 refractor.
One thought nagged at me, though... What about conventions? As in sign conventions and angle conventions? Sky Safari Pro 3 has a really nice slider tool for rotating the position angle of one's field-of-view overlay, relative to the sky. This allowed me to plan my framing really easily. And when I'm imaging, I can download a frame from the camera, and use MaximDL to plate-solve it, which gives me the image's position angle on the sky. This is really handy, but.... what if these two pieces of software use different conventions for specifying the position angle? Hmm. I could wind up with a frame that's rotated 90 degrees from what I expect.
So, it wasn't a great shock when that's exactly what happened. Here's the framing I had planned on my iPad:
Here's how things actually worked out, since the two pieces of software treated the position angle differently:
Hrm. Rargh. What to do? I could have rotated my camera 90 degrees, but that would mean refocusing and probably re-doing the GOTO alignment. Given the couple of hours available for shooting Downtown Virgo before it went behind some trees, I didn't want to do that. So, I panned around in SSP 3 and looked for an alternative framing. Here's what I wound up with:
That seemed like the best compromise, since it caught part of Markarian's Chain, and included the giant elliptical galaxy M87, the real `heart' of the Virgo cluster. I shot a couple of hours of luminance (in 5-minute subexposures), and called it a night.
Processing: Pixinsight meets the Astro Zone System
A few weeks later, I had a little time to sit down with the data, and after using the very handy new preprocessing script in Pixinsight, I saw the following preliminary result (this is a closeup of two of the galaxies in the Chain):
It's probably worth explaining what I mean by an `autostretched' image (also sometimes called an AutoSTF'ed image amongst Pixinsight enthusiasts). PI has a tool called `Screen Transfer Function' (STF), which stretches the brightness values of the image's pixels, solely for the purpose of displaying the image on the screen. It doesn't change the original pixel values in the image file, but it basically creates a temporary copy of the image to display on the screen, with the brightnesses changed so as to make the dim parts of the image more visible. The STF tool has a `Auto' button, which creates an image that nicely shows `what you got'. (I used one of these AutoSTF'ed images in my annotated Leo Triplet posting.) Such an image, though, usually doesn't make for a very pretty picture, since it shows just how noisy the dim background areas and dim parts of your target look. That graininess is a combination of instrumental noise and the eponymous photon shot noise (the latter coming from both the target objects and from the sky.)
At this point, my big goal was to do some noise reduction, and try to make the noisy, grainy-looking parts of the image look a little better. In this I was aided by Jordi Gallego's new presentation on noise reduction in PI. There's a lot of good information in this document, but I was particularly intrigued Jordi's slides 51 through 53, particularly #53. In this slide, he shows that one can make masks for applying different noise reduction settings to different parts of the image, such as:
Aha! This is basically the same concept as Ron Wodaski's Astro Zone System. I borrowed a copy of this book from a fellow Bay Area observer a couple of years ago, and found it to be very interesting. Sadly, the book has been out of print for some time, but I was one of the lucky folks at the 2011 Advanced Imaging Conference who managed to get one of the copies Ron gave away. (Thanks, Ron!)
After a little fiddling around, I realized that PI's Range Selection tool works best on images that have already been stretched into a nonlinear state, so I made a copy of the image, applied its AutoSTF settings to Histogram Transformation, and applied that to the copy. I then used Range Selection on this stretched copy.
First, I made a mask that covered up the stars and galaxies, leaving only the dark background sky to work on:
After a little fiddling around, I stumbled on some settings in Multiscale Median Transform that smoothed the background reasonably well:
I was pleased with this result! It's not perfectly smooth, but I'm calling this a win, so far. Then, I made a mask for the `mid-SNR' zone, which included the fainter outer parts of the galaxies:
And then, by pulling back on my MMT noise reduction settings, I was able to smooth those areas somewhat. Next I made a mask to isolate the cores of the galaxies, for sharpening via Deconvolution:
After mid-SNR-range smoothing and high-SNR-range deconvolution, I had this image:
The brightness levels you see here are `Auto-STF' levels, and even with the noise reduction, they're not really good for posting on the web. So, since the image was still at a linear stage (i.e. not really brightness-stretched yet), it was time for a Histogram Transformation, some star shrinking, and a horizontal flip to match the correct appearance of this area on the sky:
Room for Improvement:
I think this was a good proof-of-concept project, for the Range Selection / `Pixinsight Zone System' approach. My masks could use some work, though. When I examine the image closely, I can see that some of the dim parts of the galaxies got left out of the masking process. Also, the various processing steps left an artificial ring around M87. There really are such things as ring galaxies, but M87 isn't one of them. I'm very interested in refining my touch with Range Selection, and to trying out the new Adaptive Stretch tool! A week or so after shooting these data, I managed to shoot Markarian's Chain with proper framing, and so we'll see how things go with this new data set.
![]() |
| A portion of the Virgo galaxy cluster, with the giant elliptical galaxy M87 at top left, and part of `Markarian's Chain' of galaxies at right. Click the image for a larger version, or click here for full size. |
A few weeks ago, I was doing some backyard imaging, and the Virgo galaxy cluster seemed like the logical choice. Having shot a luminance image of the Leo Triplet not long before, I decided to do another one-night stand, with just luminance, but this time I wanted to shoot `Downtown Virgo'. (The origins of that term and its enthusiastic usage seem to go back to Jay Freeman and Jamie Dillon, two highly-accomplished Bay Area visual observers.) Specifically, I wanted to shoot the portion of the Virgo cluster called Markarian's Chain. It's a standard target, since it comprises a pretty, arc-ing chain of galaxies that stretch from M84 and M86 towards M88. Almost everyone works on an image of Markarian's Chain at some point. By planning it out in SkySafari Pro 3 on my iPad, I could see that if I rotated my camera just right, I could frame most of the chain pretty nicely on my ST-8300 sensor, using my ED80 f/7.5 refractor.
One thought nagged at me, though... What about conventions? As in sign conventions and angle conventions? Sky Safari Pro 3 has a really nice slider tool for rotating the position angle of one's field-of-view overlay, relative to the sky. This allowed me to plan my framing really easily. And when I'm imaging, I can download a frame from the camera, and use MaximDL to plate-solve it, which gives me the image's position angle on the sky. This is really handy, but.... what if these two pieces of software use different conventions for specifying the position angle? Hmm. I could wind up with a frame that's rotated 90 degrees from what I expect.
So, it wasn't a great shock when that's exactly what happened. Here's the framing I had planned on my iPad:
Here's how things actually worked out, since the two pieces of software treated the position angle differently:
Hrm. Rargh. What to do? I could have rotated my camera 90 degrees, but that would mean refocusing and probably re-doing the GOTO alignment. Given the couple of hours available for shooting Downtown Virgo before it went behind some trees, I didn't want to do that. So, I panned around in SSP 3 and looked for an alternative framing. Here's what I wound up with:
That seemed like the best compromise, since it caught part of Markarian's Chain, and included the giant elliptical galaxy M87, the real `heart' of the Virgo cluster. I shot a couple of hours of luminance (in 5-minute subexposures), and called it a night.
Processing: Pixinsight meets the Astro Zone System
A few weeks later, I had a little time to sit down with the data, and after using the very handy new preprocessing script in Pixinsight, I saw the following preliminary result (this is a closeup of two of the galaxies in the Chain):
| Autostretched image of two galaxies in Markarian's Chain. |
It's probably worth explaining what I mean by an `autostretched' image (also sometimes called an AutoSTF'ed image amongst Pixinsight enthusiasts). PI has a tool called `Screen Transfer Function' (STF), which stretches the brightness values of the image's pixels, solely for the purpose of displaying the image on the screen. It doesn't change the original pixel values in the image file, but it basically creates a temporary copy of the image to display on the screen, with the brightnesses changed so as to make the dim parts of the image more visible. The STF tool has a `Auto' button, which creates an image that nicely shows `what you got'. (I used one of these AutoSTF'ed images in my annotated Leo Triplet posting.) Such an image, though, usually doesn't make for a very pretty picture, since it shows just how noisy the dim background areas and dim parts of your target look. That graininess is a combination of instrumental noise and the eponymous photon shot noise (the latter coming from both the target objects and from the sky.)
At this point, my big goal was to do some noise reduction, and try to make the noisy, grainy-looking parts of the image look a little better. In this I was aided by Jordi Gallego's new presentation on noise reduction in PI. There's a lot of good information in this document, but I was particularly intrigued Jordi's slides 51 through 53, particularly #53. In this slide, he shows that one can make masks for applying different noise reduction settings to different parts of the image, such as:
- The dark background sky, which has the lowest signal-to-noise ratio (SNR), and is thus the `grainiest'-looking part of the image.
- The dim parts of the deep-sky object(s), which have fairly low SNRs, and thus mostly need smoothing and noise reduction.
- The bright parts of the deep-sky object(s), which have high SNRs, and thus can tolerate some sharpening, such as through deconvolution.
Aha! This is basically the same concept as Ron Wodaski's Astro Zone System. I borrowed a copy of this book from a fellow Bay Area observer a couple of years ago, and found it to be very interesting. Sadly, the book has been out of print for some time, but I was one of the lucky folks at the 2011 Advanced Imaging Conference who managed to get one of the copies Ron gave away. (Thanks, Ron!)
After a little fiddling around, I realized that PI's Range Selection tool works best on images that have already been stretched into a nonlinear state, so I made a copy of the image, applied its AutoSTF settings to Histogram Transformation, and applied that to the copy. I then used Range Selection on this stretched copy.
First, I made a mask that covered up the stars and galaxies, leaving only the dark background sky to work on:
After a little fiddling around, I stumbled on some settings in Multiscale Median Transform that smoothed the background reasonably well:
I was pleased with this result! It's not perfectly smooth, but I'm calling this a win, so far. Then, I made a mask for the `mid-SNR' zone, which included the fainter outer parts of the galaxies:
And then, by pulling back on my MMT noise reduction settings, I was able to smooth those areas somewhat. Next I made a mask to isolate the cores of the galaxies, for sharpening via Deconvolution:
After mid-SNR-range smoothing and high-SNR-range deconvolution, I had this image:
The brightness levels you see here are `Auto-STF' levels, and even with the noise reduction, they're not really good for posting on the web. So, since the image was still at a linear stage (i.e. not really brightness-stretched yet), it was time for a Histogram Transformation, some star shrinking, and a horizontal flip to match the correct appearance of this area on the sky:
Room for Improvement:
I think this was a good proof-of-concept project, for the Range Selection / `Pixinsight Zone System' approach. My masks could use some work, though. When I examine the image closely, I can see that some of the dim parts of the galaxies got left out of the masking process. Also, the various processing steps left an artificial ring around M87. There really are such things as ring galaxies, but M87 isn't one of them. I'm very interested in refining my touch with Range Selection, and to trying out the new Adaptive Stretch tool! A week or so after shooting these data, I managed to shoot Markarian's Chain with proper framing, and so we'll see how things go with this new data set.
Subscribe to:
Posts (Atom)


